Breakout Alternate Version
Breakout is a great classic arcade style game that we can use to develop JavaScript skills and to get to grips with some of the game techniques that will be used throughout the book.
Breakout was first developed by Atari as a single player follow up to “Pong”. It was originally implemented using discrete electronic components with not a line of program code in sight. In fact, there were so many components involved in the original Atari design that Steve Jobs (who was working there in pre-Apple days) was asked to see if the design could be optimised. Indeed, Steve Jobs was offered a bonus based upon the final number of electronic parts in the optimised design. Steve Jobs called in his friend Steve Wozniak and offered him a share of the fee (not, you may note, a share of the bonus) and together they designed and prototyped a version in just 4 days. The final product Atari shipped did not use Steve Wozniak’s design as it was considered difficult to manufacture but the exercise did result in a slimmed down final version. Point is, this game involved some key characters in the microcomputer revolution when it was developed. Indeed, Steve Wozniak implemented a version of the game in Basic on the Apple II computer. We are following in the footsteps of greatness.
First off, we are going to need just a little bit of HTML to act as scaffolding for our game area on screen.
Before getting started on that though, I suggest creating a new folder somewhere on your hard drive to hold all of the games we are going to develop. I called mine “Games”. Within that folder I then added a new folder for the first game and I gave it the name “Breakout”. It does not matter what you call yours – just make it easy to find things when you need to. I am assuming that users of Windows, Linux and Mac computers are familiar with using the “File Explorer” or “Files” or “Finder” applets to do just that. It may be though that Chromebook users have not got a lot of experience creating local folders.
On a Chromebook, click the Launcher Button (left hand bottom corner), then the up arrow to reveal the app list. At the top you should see the “Files” button. Click that to open the app. I put my folders on the SD card and you might like to do the same if an SD card slot is available. If not, then there should be more local storage available ready to use under “My Files”.
Now start Visual Studio Code (VS Code) and use the File menu to select “Open Folder”. Find and select the new Breakout folder. Use the file menu or new file icon to create a new file called breakout.html. This will be added to the current folder.
You now need to type in some HTML so that it looks just like the following:
<!DOCTYPE html>
<html>
<head>
    <meta charset="utf-8" />
    <meta http-equiv="X-UA-Compatible">
    <title>Breakout</title>
    <meta name="viewport" content="width=device-width, initial-scale=1">
    <link rel="stylesheet" type="text/css" media="screen"
                                         href="main.css" />
 </head>
<body>
    <canvas id="playArea"></canvas>
    <script src="main.js"></script>
</body>
</html>
We met some of these HTML components in the short introduction in chapter 2. An explanation for the others might be in order now.
Two of the lines in the <head> section simply tell any web browser something about the HTML document.
<meta charset="utf-8" />
<meta http-equiv="X-UA-Compatible">
The next line of interest helps a mobile browser manage the page layout by setting the width to match the device and the initial zoom level. While not necessary for PC based viewing we might as well add it in for when you want to show off your game and it might end up running on a tablet.
<meta name="viewport" content="width=device-width, initial-scale=1">
The document <body> only contains one HTML object and that is a <canvas> tag. We will draw our game on the surface of the canvas. There are two lines that import code from other files. The line in the <head> imports a CSS file which we will create next.
<link rel="stylesheet" type="text/css" media="screen" href="main.css" />
The line at the bottom of the <body> imports a JavaScript file and that is at the bottom so it is imported last. This is one way of ensuring that the code in that file does not run before the HTML document has been fully loaded and rendered in the browser window.
Once the HTML has been added, use the File menu again and select “Save” (noticing that the shortcut is <ctrl><s> for future use).
We can then go on and create another new file in the game development folder called main.css. This CSS file should contain the following lines:
html { padding: 0; margin: 0; }
canvas { background: #ddd; display: block;
         margin: 0 auto; overflow: hidden;}
The key part of the second CSS line sets a background colour for the canvas element to a neutral grey.
Now we can start in on the JavaScript by creating yet another file in the game folder, this time called main.js. In this JavaScript file we are going to initialise 2 variables that will connect our code to the canvas HTML element and then add three functions. Starting with the variables:
var canvas = document.getElementById("playArea");
var ctx = canvas.getContext("2d");
The first line creates a variable called canvas which is going to represent the canvas HTML element in our code. The line uses the getElementByID() function that belongs to the document object. The id in question is the id we gave the canvas element in the HTML file. In this book we will use HTML element id values to link CSS to document components as well as to connect to JavaScript object variables. The variable name could have been any valid variable name but selecting canvas might help to clearly identify what the variable represents as the code base grows.
The second variable is called a context variable and we will use this when we start drawing things onto the canvas element. So, type those first two lines into the main.js code file tab in VS Code and then continue with the functions below.
The first function we are going to write is called resizeCanvas and the reason why that is a suitable name will become clear a little later. This function sets the width and height of the canvas element. The values window.innerWidth and window.innerHeight are the sizes of the browser tab window ignoring any border and their values are maintained by the browser window ready for us to use. Setting these sizes mean that our canvas element will fill the browser window. Add the following to the main.js file.
function resizeCanvas() {
    canvas.width = window.innerWidth;
    canvas.height = window.innerHeight;
    redraw();
}
This is the first function we have written for our game. Notice that it does not have any arguments passed to it so the brackets following the function name are empty.
The third line of that function calls another function called redraw and that is the next one we need to write.
The redraw() function is going to draw a red rectangle and a blue circle onto the HTML canvas element. Add this new function to the main.js file as well.
function redraw() {
    ctx.beginPath();
    ctx.rect(20, 20, 50, 25);
    ctx.fillStyle = "red";
    ctx.fill();
    ctx.closePath();

    ctx.beginPath();
    ctx.arc(140, 120, 15, 0, Math.PI * 2, false);
    ctx.fillStyle = "blue";
    ctx.fill();
    ctx.closePath();
}
Drawing the rectangle is the simplest to understand. The code works with members of the canvas context object we created at the top. The code starts a new drawing path and then uses the rect() function to describe a rectangle. The first number passed as an argument is the number of drawing units in from the left-hand edge and the second, the number of drawing units down from the top edge. The third number is the rectangle width and the fourth the rectangle height. The code follows that by setting a colour as the style to be used to fill the rectangular area. The fill() function draws the rectangle and the process is completed with the closePath() function.
To draw the circle we use the arc() function. This function can draw any portion of an arc but in this case, we want a complete circle rather than just a segment. The arc() function is also passed a set of numbers. The first two set the position of the centre of the circle with the distance from the left hand and top edges of the canvas. The third number sets the radius of the circle. The fourth number sets the start position for drawing the arc where 0 (zero) is the three o’clock position. The fifth number sets the finish point for the arc and as this is set using radians then we use the value Pi multiplied by 2 which is 360 degrees.
Rather than writing out the value of Pi (something like 3.14159) we can use the value for Pi supplied by the inbuilt JavaScript Math object. The final value passed to the arc function sets the direction (clockwise or anticlockwise) that should be used to draw the arc. Clearly, if we are drawing a complete circle then the direction is not that important but here, I have gone with the default value – which, in fact, can be omitted.
We are next going to add a function to initialise things so we can go ahead and call it initialise().
function initialise(){
    window.addEventListener('resize', resizeCanvas);
    resizeCanvas();
}
The first line of initialise() sets an event listener to watch out for the browser window being resized. If it is triggered, it will call the resizeCanvas() function to make sure that the canvas element is itself resized to fill the window. The function then calls the resizeCanvas() function for the first time just to ensure that happens at least once and that the redraw function is called, in turn, to draw our two initial coloured objects.
The final line that needs to be added to the end of the JavaScript code file is one that runs the initialise function. So the very last line of the JavaScript file should be:
initialise();
Make sure that all of the three file changes are saved using the file menu option or <Ctrl><s> for each tab.
Now to try out the code by getting our chosen browser to open the breakout.html document and to run our JavaScript. Make the HTML tab the “current tab” by clicking on the tab header. Now you can use the "Run” menu. Click the menu and select the option “Start Debugging”. If the only Run Menu option is to Install Additional Debuggers then click back into the body of code on the HTML tab and try again.
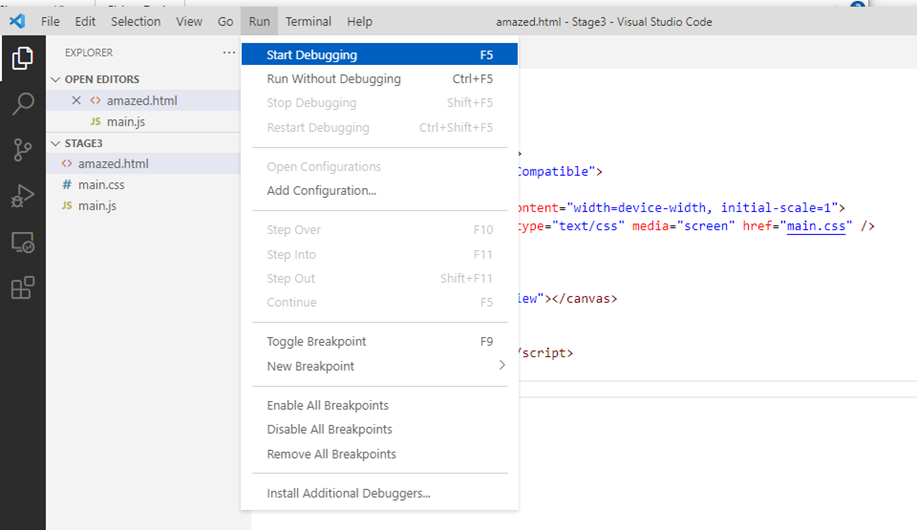
You will then be offered a choice of browser if you have more than one installed on your PC. Select the “Chrome” option and that will become the default for the run action with this program.
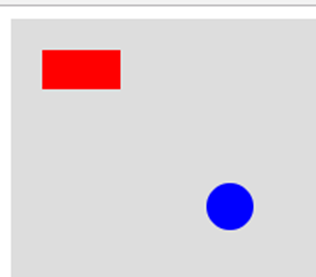
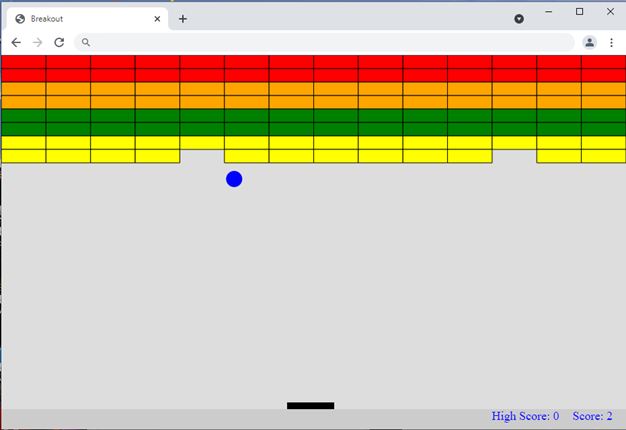
That should start a new Chrome browser window and you should see something like:
If this is not what you see, then you will have to recheck your code looking for spelling mistakes or missing lines. The most likely error would be typing a lower-case letter rather than an upper-case letter in the few places these are used.
If you get stuck, then you might like to skip ahead to the chapter on using the Chrome developer tools for debugging. Then come back and press on with the second stage.
If things went as expected (or once you have found any bug) then you should pat yourself on the back as you have used canvas drawing to create examples of the two key elements in Breakout – a brick and a ball.
You can close the browser window showing your first test directly or using the controls that popped up on the VS Code window, which I would recommend.
Stage 2
The next thing to be introduced is movement. We want our ball to appear to move around the play area. We will simulate movement by drawing the ball then erasing the screen and then re-drawing the ball in a slightly different position. If we repeat these drawing actions then our eyes will be fooled into seeing continuous movement in just the same way as a projected film works on a cinema screen.
We are not going to make any changes to the HTML or CSS files at this stage so we will confine all of the changes to the JavaScript file.
We need to add four more variables at the top of that file to represent the current ball position and to set how far the ball should move every time the game window is redrawn. Change the main.js file so that it starts with:
var canvas = document.getElementById("playArea");
var ctx = canvas.getContext("2d");
var ballX = 0, ballY = 0;
var ballMoveX = 2;
var ballMoveY = -3;
The ballX variable will hold the x position across the canvas where 0 is the left-hand edge. The ballY variable will hold the vertical ball position where 0 is the top of the canvas element. Notice the first new line creates and assigns values to two variables at once.
We can now write a new function called drawBall() before making some changes to the existing ones.
The drawBall() function uses the circle drawing method we have already met with two key additions. There is a line at the start that clears the whole drawing surface rectangle and two lines at the end to update the ball position each time the function is called.
function drawBall() {
    ctx.clearRect(0, 0, canvas.width, canvas.height);
    ctx.beginPath();
    ctx.arc(ballX, ballY, 15, 0, Math.PI*2);
    ctx.fillStyle = "blue";
    ctx.fill();
    ctx.closePath();
    ballX += ballMoveX;
    ballY += ballMoveY;
}
You are probably getting the idea that programming involves quite a lot of typing in code. If you are using VS Code you will have noticed that the “intellisense” feature helps out a lot. You will also find that the syntax becomes quite natural after a while and it is a less of a strain getting things right. You get a feel for things like function and variable names and the way upper case letters are used to start any second word in a name (this is a convention, by the way, not a rule).
The next step is to remove all of the current code lines inside the redraw() function. They are replaced with a call to our new drawBall() function. So it now looks like:
function redraw() {
 drawBall();
}
All we need to do now is set an initial position for the ball and to tell the browser to keep calling the redraw function. For the moment we can set the initial ball position in the resizeCanvas() function and remove the call to redraw(). Change it to look like:
function resizeCanvas() {
    canvas.width = window.innerWidth;
    canvas.height = window.innerHeight;
    ballX = canvas.width / 2;
    ballY = canvas.height - 20;
}
Then we need to add one new line to the initialise function.
function initialise(){
    window.addEventListener('resize', resizeCanvas);
    resizeCanvas();
    setInterval(redraw, 10);
}
The code will now use a timer managed by the setInterval() function to keep calling the redraw() function every 10 thousandths of a second.
Time to run and admire your work again. After saving the changes to the main.js file, you can return to the HTML tab and use the Run menu again to test your code. Remember, it is the HTML that is run and that, in turn, runs your JavaScript. The blue ball should appear to start at the bottom of the browser window and will head off towards the top right. You can re-run the sequence by using the browser reload button, the run controls in VS Code or by using your mouse to resize the window.
In any game situation you would probably want a ball to stay within the play area of the browser window, so let’s make that the next step.
Editing code and making lots of changes can be frustrating so why did we write functions like redraw() one way and then move a chunk of the code to a new function? Why don’t we just write it correctly from the start? That is a very reasonable question and needs an explanation.
It is very rare that we can start writing a program knowing everything that we will need to write and to take into account. Even when we are in such a happy place, it is very likely that unexpected problems will turn up or that we suddenly get a great idea for a new feature. Writing a program that we can’t run until it is complete in every detail also puts off a whole heap of trouble. Left alone, bugs and errors get intermixed and it can become very difficult to sort out the mess.
An effective way of writing any new body of code is to start with the simplest thing we can think of that actually does something. We can then progress, adding new features and components, testing each step as we go. Inevitably we will refine and rewrite some sections but the intervals between having something that can be run and tested can be kept very short. Our program will of course be incomplete during the development process but it should never be overwhelmed by bugs. This is a tried and tested technique.
Stage 3
In the interest of continuous code improvement, we can add another variable to hold the ball radius and change the ball movement timing. You might like to try out some different values when we have completed and tested the changes for this stage. Please add the new line towards the top of the JavaScript code file where the other variables are declared.
var ballRadius = 14;
Then change the setInterval() time value in the initialise() function. I expect that you can find where to make the change.
setInterval(redraw, 5);
The rest of the programming action is in the drawBall() function where we can add some lines to limit the movement of the ball causing the direction (x across or y up and down) to reverse at the edge of the window. Please extend the function so that it looks like:
function drawBall() {
    ctx.clearRect(0, 0, canvas.width, canvas.height);
    ctx.beginPath();
    ctx.arc(ballX, ballY, ballRadius, 0, Math.PI*2);
    ctx.fillStyle = "blue";
    ctx.fill();
    ctx.closePath();
    if((ballX + ballMoveX + ballRadius) > canvas.width){
        ballMoveX = -ballMoveX;
    }
    if(ballX + ballMoveX < ballRadius ){
        ballMoveX = -ballMoveX;
    }
    if((ballY + ballMoveY + ballRadius) > canvas.height) {
        ballMoveY = -ballMoveY;
    }
    if(ballY + ballMoveY < ballRadius){
        ballMoveY = -ballMoveY;
    }
    ballX += ballMoveX;
    ballY += ballMoveY;
}
There are now four if statements that check to see if the ball is likely to run off through one of the edges of the browser window. The if statements take the position of the centre of the ball, the next movement to be applied and the ball radius into account. If the ball is going to leave the screen, the ball x movement or y movement is reversed by negating the movement value. If the ball was going to bump into the top of the window, then the ballMoveY value needs to become positive so it will move downwards. If the ball is running into the bottom of the window, then that same value needs to become negative so the ball moves upwards. I hope that makes sense.
Time to fire up a new test in the browser and admire our ball whizzing around – that’s if those long conditional statements were added without any slips.
You might notice that if you start using your mouse to resize the browser window you can create a situation where the ball disappears over an approaching window edge as the browser resize event is only triggered when the resizing is complete. We can deal with this and tidy the code up a little before starting in on turning what we have into a playable game.
Stage 4
This is a great point to start improving the structure of our code by introducing our first JavaScript object. This object will hold all of the ball related values and we can extend this approach to other game elements as we add them.
Replace the four lines near the top of the JavaScript file that define ball related variables with this new ball object.
var ball = {
    x: 0,
    y: 0,
    moveX: 3,
    moveY: -2,
    radius: 12
};
Inevitably the introduction of the ball object will mean some changes to the functions that used the old ball variables. The ball radius for instance, would now be referenced using ball.radius (remember the “dot” notation).
We can also do some other tidying in anticipation of some more elements to be drawn on the canvas. So, start by moving the code that places the ball at an initial location to the initialise() function. While a game is running, we probably do not want to reset those values if the window is resized. We are also now using the values ball.x and ball.y to mark the ball’s position so make the required changes shown below.
function initialise(){
    window.addEventListener('resize', resizeCanvas);
    ball.x = window.innerWidth / 4;
    ball.y = window.innerHeight - ball.radius;
    resizeCanvas();
    setInterval(redraw, 10);
}
The resizeCanvas function can also ensure that the ball is retained within the browser window.
function resizeCanvas() {
    canvas.width = window.innerWidth;
    canvas.height = window.innerHeight;
    if(ball.x > canvas.width)  {
        ball.x = canvas.width;
    }
    if(ball.y > canvas.height){
        ball.y = canvas.height;
    }
}
We should also move (cut/paste) the clearRectangle() function out of the drawBall() function and into the start of the redraw() function before drawing more screen items.
It is very close to a programming rule that a function should stick to a single task and that it should be as short as possible. Sometimes those rules are going to be broken but perhaps we should make an effort here.
Let’s start with collision detection (a big feature of so many games). We are going to be colliding with bricks and the game paddle as well as the “walls” of the game area before we have finished so collision detection itself might need to be broken down into separate functions.
Starting with a new function called hasBallHitWall()
function hasBallHitWall(){
    if((ball.x + ball.moveX + ball.radius) > canvas.width ||
        ball.x + ball.moveX < ball.radius){
            ball.moveX = -ball.moveX;
    }
}
Followed by hasBallHitTop():
function hasBallHitTop(){
    // we are going to still include the bottom for now
    if((ball.y + ball.moveY + ball.radius) > canvas.height ||
        ball.y + ball.moveY < ball.radius) {
            ball.moveY = -ball.moveY;
    }
}
Why is it more efficient to test the ball.x position or ball.y position using a single if statement including the || operator? The stage 3 version tested the ball position four times. So even if the ball had run into the right hand edge of the canvas and been reversed we also ended up checking to see if it might have run into the left hand edge. When JavaScript evaluates an if statement with two conditions where either of them will result in the same action then the code can short-circuit the second test if the first proves to be true.
Also note that a long JavaScript statement can be broken up over more than one line. The final semicolon unambiguously marks the statement end.
We can bundle our collision detection with the ball paint and move them all another new function.
function manageBall(){
    drawBall();
    hasBallHitWall();
    hasBallHitTop();
    ball.x += ball.moveX;
    ball.y += ball.moveY;
}
Then delete the redundant lines in the original drawBall() so it is shortened to:
#function drawBall() {
    ctx.beginPath();
    ctx.arc(ball.x, ball.y, ball.radius, 0, Math.PI*2);
    ctx.fillStyle = "blue";
    ctx.fill();
    ctx.closePath();
}
Which just leaves that small change to redraw().
function redraw() {
    ctx.clearRect(0, 0, canvas.width, canvas.height);
    manageBall();
}
Running the latest version should show that nothing has changed visually but our code is now ready for some big steps forward.
Stage 5
Those big steps start with the first additions to the HTML. Switch to the HTML file tab and edit the <body> section so that it matches the code below:
<body>
    <canvas id="playArea"></canvas>
    <div id="dvGameBar">
       <div id="dvScore">
           <label id = "lblScore">Score: 0</label>
       </div>
    </div>
    <script src="main.js"></script>
</body>
We can position and size the new elements using CSS. So, switch to editing the main.css file and extend the content to match the code below. This includes changes to the CSS supporting the canvas and main HTML elements. The changes include additions to the CSS supporting the canvas and HTML elements.
html { padding: 0; margin: 0; border: 0;}
canvas { background: #ddd; display: block; margin: 0 auto; overflow: hidden; top: 0; left: 0; position: absolute;}
#dvGameBar {
    background: #cccccc; display: block; height: 30px; width: 100%; position: fixed; bottom: 0px; left: 0;
}
#dvScore {
    float: right;
    width: auto;
}
#lblScore {
    color: blue;
    font-size: large;
    margin-right: 10px;
    margin-top: 5px;
}
The new CSS rules are applied to the HTML elements with matching id values. dvGameBar has a set height and is positioned at the bottom of the browser window. The width is 100% of the browser window. The <div> dvScore sits within the dvGameBar <div> but floats towards the right-hand end. The width can adjust to match the content. The <label> lblScore sits within the dvScore <div> and has its font colour and size set together with some margins that ensure it is nicely placed within its enclosing <div>.
Now back to the JavaScript. We need to add two variables to give us references to the two most significant additions to the HTML. The JavaScript should now start:
var canvas = document.getElementById("playArea");
var ctx = canvas.getContext("2d");
var bar = document.getElementById("dvGameBar");
var score = document.getElementById("lblScore");
The game is going to need a “paddle” to hit the ball so we might as well add an object to hold the paddle dimensions and position – in the same way as we gathered the ball values into a single object. Add this just before or after the ball object in the JavaScript code file.
var paddle = {
    x: 0,
    y: 0,
    height: 10,
    width: 70,
    moveX: 3,
    moveBy: 0
};
We can set the start position of the paddle in the resizeCanvas() function. Both the ball start position and the paddle position need to allow for the bottom bar below the canvas element.
bar.clientHeight
The clientHeight of an HTML object is the visible height including any padding but excluding any border scrollbar or margin.
We also need to change the setting for the canvas height in the resizeCanvas() function.
function resizeCanvas() {
    canvas.width = window.innerWidth;
    canvas.height = window.innerHeight - bar.clientHeight;
    if(ball.x > canvas.width)  {
        ball.x = canvas.width;
    }
    if(ball.y > canvas.height){
        ball.y = canvas.height;
    }
    paddle.x = (canvas.width - paddle.width) / 2;
    paddle.y = canvas.height-paddle.height;
    redraw();
}
Next add a new function to draw the paddle which is just a rectangle.
function drawPaddle() {
    ctx.beginPath();
    ctx.rect(paddle.x, paddle.y, paddle.width, paddle.height);
    ctx.fillStyle = "black";
    ctx.fill();
    ctx.closePath();
}
Make sure the new function is added before the final line in the JavaScript file and feel free to change the paddle colour if you want.
The redraw() function now needs to call the drawPaddle() function as well as the manageBall() function.
function redraw() {
    ctx.clearRect(0, 0, canvas.width, canvas.height);
    manageBall();
    drawPaddle();
}
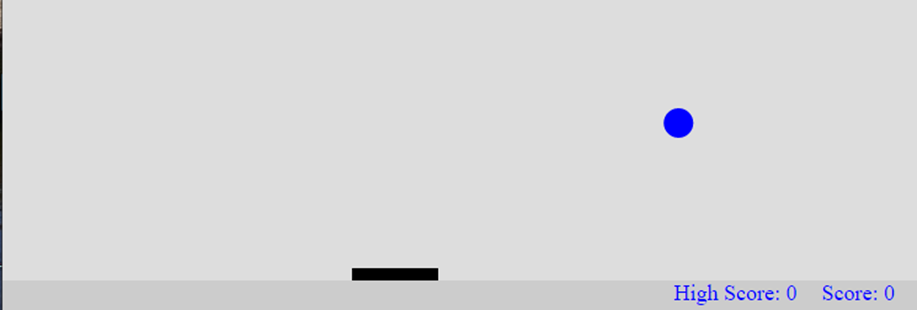
Once again it is time to run a test and clear out any typos or errors in the new code. You should see a zero score being displayed at the bottom right and the paddle being drawn at the bottom of the playing area.
Stage 6
The next stage edges us closer to a playable game. Let’s start again with the HTML and anticipate a need for a high score. You will have noticed that the non-JavaScript bits are sneaking in as we go along.
So, in the HTML file, change the <div> with the id of dvGameBar to include a message area and a high score.
<div id="dvGameBar">
    <div id="dvMessage">
        <label id = "lblMessage">Press Enter to start</label>
    </div>
   <div id="dvScore">
       <label id = "lblScore">Score: 0</label>
   </div>
   <div id="dvHighScore">
        <label id="lblHighScore">High Score: 0</label>
    </div>
</div>
Of course, the new HTML elements will need some CSS to style and place them. Fortunately, they can share some of the existing CSS rules. The CSS “selector” can include a list of elements separated by commas. Edit the CSS file to match the content shown below:
html { padding: 0; margin: 0; border: 0;}
#playArea { background: #ddd; display: block; margin: 0 auto; overflow: hidden; top: 0; left: 0; position: absolute;}
#dvGameBar {
    background: #cccccc; display: block; height: 30px; width: 100%; position: fixed; bottom: 0px; left: 0;
}
#dvMessage {
    float: left;
    width: auto;
    margin-left: 50px;
}
#dvScore, #dvHighScore {
    float: right;
    width: auto;
    margin-right: 10px;
}
#lblScore, #lblHighScore, #lblMessage {
    color: blue;
    font-size: large;
    margin-right: 10px;
    margin-top: 5px;
}
Did you notice that the VS Code CSS tab showed a little colour block next to the rule for an item’s colour?
The JavaScript now needs variables to connect to the two new label elements. You should add these new statements near the top of the JavaScript file.
var hScore = document.getElementById("lblHighScore");
var mess = document.getElementById("lblMessage");
It now looks like a good idea to have a JavaScript object holding values for the game alongside the ball and paddle objects. So, let’s start that off like:
var game = {
    lives: 3,
    playing: false,
    score: 0,
    highScore: 0
};
The new game object introduces a couple of new features. There is a value for the number of lives a player has for a round of the game. Plus, there is a Boolean value for “playing” which starts set false. This can be used to help start and terminate the game.
It is about time that our JavaScript started responding to user input to move the paddle, release a ball and to start the game. We can add support for both the arrow keys (left and right) and the mouse for moving the paddle. We need to add event listeners to watch out for and deal with keyboard and mouse events. Change the initialise() function as follows:
function initialise(){
    window.addEventListener("resize", resizeCanvas);
    window.addEventListener("mousemove", mouseHasMoved);
    window.addEventListener("keydown", keyPressed);
    window.addEventListener("keyup", keyReleased);
    paddle.x = (window.innerWidth - paddle.width) / 2;
    resizeCanvas();
    setInterval(redraw, 10);
}
Event Listeners
It seemed logical that the browser window would know that it had been resized and that we could ask the window to call a named JavaScript function when that happened. Here though, we are seeing some more events happening in and around the browser window that we can write code to respond to. The appendices include a list of the more common events generated by user interaction with a web browser. Here we are adding code to respond to keyboard events (when the browser window has focus) and to the mouse moving over the web browser window.
The “mousemove” event is going to be handled by a function called mouseHasMoved(). Let’s write that one first.
function mouseHasMoved(event) {
    let mouseRelX = event.clientX - canvas.offsetLeft;
    if(mouseRelX > 0 && mouseRelX < canvas.width - paddle.width) {
        paddle.x = mouseRelX;
    }
}
The browser helpfully passes an argument to the function that gives us some information about the mousemove event. Here we have called that function argument (and local variable) “event” just to make that clear. The key data point we are looking for is the x position of the mouse; that is where it is in relation to the left-hand edge of the browser window. To work out where that is in relation to the canvas playing area, we have to use the position of the left-hand edge of the canvas element within the browser window. If the mouse is within the canvas area, then we can move the paddle horizontally to track the mouse. We do this by setting the paddle.X value. That value can then be used by the drawPaddle() function to draw it on the canvas surface.
Notice that when the new variable mouseRelX was declared in that function the keyword “let” was used rather than “var”. This ensures that the JavaScript engine knows that the variable will only be used within the current code block which, in this instance, is the mouseHasMoved() function.
Moving the paddle in response to the arrow keys needs a bit more code. We want the paddle to move a set distance each time an arrow key is pressed and to keep moving in the same direction if the key is held down. We therefore have to track the keys being pressed and then subsequently released.
We are also interested in a Return key press as that can be used to launch the game and a ball onto the game area.
Start with a function to place the ball as it is no longer being managed by the initialise() function.
function placeBall(){
    ball.x = canvas.width / 4;
    ball.y = canvas.height - (ball.radius + paddle.height);
    ball.moveY = -(Math.abs(ball.moveY));
}
Then the new keyPressed() function:
function keyPressed(event) {
    if(event.keyCode === 13){
        // Enter key
        if(game.playing == false){
            mess.style.display = "none";
            placeBall();
            game.playing = true;
        }
    }
    if(event.keyCode === 37){
        //left arrow
        if(paddle.moveBy === 0) {
            paddle.moveBy = -paddle.moveX;
        }
    }
    if(event.keyCode === 39){
        //right arrow
        if(paddle.moveBy === 0){
            paddle.moveBy = paddle.moveX;
        }
    }
}
Again, the browser supplies an argument to the function to give us some information about the key that has been pressed. The crucial data here is the event.keyCode. Each key on the keyboard has a different key code. There is a complete list of key codes in the appendices of this book. For the moment we are interested in the arrow keys with keyCode values 37 and 39 and the enter key we are going to use to literally start the ball rolling.
Starting with the enter key, the code first checks to see if the game is currently playing. If not, then we can position the ball at the lower edge of the canvas area and start it on its way up the screen. The ball.MoveY value is set to a negative value to ensure that it subsequently moves towards the top of the play area. The expression Math.abs(ball.MoveY) will always return a positive value even if ball.MoveY is negative and the entire expression ensures that the final value is negative. The final function line sets game.playing to true to avoid the potential of having two balls in play at once. The message area label is also hidden by setting the display attribute to “none”.
The arrow keys set the paddle.moveBy value to the preset paddle.moveX value. In the case of the left arrow key this is negated as we want the paddle to move left to a lower x position – which is closer to the left-hand edge of the canvas element.
Before we look at how these values are used by the paddleDraw() function we can quickly add the simpler keyReleased() function.
function keyReleased(event) {
    if(event.keyCode === 37 || event.keyCode === 39){
        paddle.moveBy = 0;
    }
}
Here we are only really interested in the release of the arrow keys as that signifies that the paddle should stop moving in its current direction. This is simply achieved by setting the paddle.moveBy value to zero.
The drawPaddle() function now needs additional code to respond to a non-zero paddle.moveBY value together with some checks that ensure that we do not let the paddle move out of the screen area.
Starting with a function to check if the paddle is going to hit the left or right border of the canvas (collision detection). It returns a zero value if a paddle move would do so.
function checkPaddleLimits(){
    if (paddle.x + paddle.moveBy <= 0){
        return 0;
    } else {
        if(paddle.x + paddle.width + paddle.moveBy >= canvas.width){
            return 0;
        }
    }
    return paddle.moveBy;
}
The paddle.X value marks the left hand edge of the paddle so the check that the paddle is not trying to travel beyond the right hand edge needs to take the paddle.width value into account.
The drawPaddle function can now call checkPaddleLimits().
function drawPaddle() {
    ctx.beginPath();
    ctx.rect(paddle.x, paddle.y, paddle.width, paddle.height);
    ctx.fillStyle = "black";
    ctx.fill();
    ctx.closePath();
    paddle.moveBy = checkPaddleLimits();
    paddle.x += paddle.moveBy;
}
The redraw function should call drawPaddle() and apply a check to ensure that the game.playing value is true before drawing and moving the ball. If the ball is not “in play” then we don’t need to draw it.
function redraw() {
    ctx.clearRect(0, 0, canvas.width, canvas.height);
    if (game.playing){
        manageBall();
    }
    drawPaddle();
}
Now all we need is some additional code to handle the interaction between the paddle and the ball and (if the player misses the ball) allow the ball to leave the play area.
We can start with a function to check if the ball has hit our paddle. This is a little bit simplistic as it does not allow for the ball just catching the paddle ends but it will work well enough for the next stage or two.
function hasBallHitPaddle(){
    if(ball.y + ball.moveY + ball.radius >= paddle.y){
        if(ball.x >= paddle.x && ball.x <= paddle.x + paddle.width){
            ball.moveY = -ball.moveY;
        }
    }
}
We also need a separate function now to check if a ball is “lost” at the bottom of the game area. This function returns true or false based upon the comparison expression result – a useful way of writing less code.
function ballHasHitBottom(){
    return (ball.y + ball.moveY + ball.radius) >= canvas.height;
}
That function means we can now simplify hasBallHitTop():
function hasBallHitTop(){
    if(ball.y + ball.moveY < ball.radius){
        ball.moveY = -ball.moveY;
    }
}
Now a function to deal with “lost” balls:
function ballLost(){
    game.playing = false;
    game.lives--;
    if(game.lives > 0){
        mess.textContent = "Press Enter for next ball";
    } else {
        mess.textContent = "Game Over";
        if(game.score > game.highScore){
            game.highScore = game.score;
            hScore.textContent = "High Score: " +
                                 game.highScore;
        }
    }
    mess.style.display = "block";
}
Then a couple of additions to manageBall() to apply the new test functions.
function manageBall(){
    drawBall();
    hasBallHitWall();
    hasBallHitTop();
    hasBallHitPaddle();
    if (ballHasHitBottom()){
        ballLost();
        return;
    }
    ball.x += ball.moveX;
    ball.y += ball.moveY;
 }
Some of the new ball related code is a little forward looking as it deals with game scores and game lives but we might as well add those changes here in expectation of making those advances. Also note, setting the display attribute of the message label to “block” makes the label visible.
Setting an HTML element’s textContent does what you would expect.
If you test run the current version you will find that you can use the paddle to keep the ball bouncing around the play area. Try using the keys and then the mouse to check that both input methods are working properly. The ball is perhaps just a bit slow after the timer speed got reset to 10 milliseconds but we can speed things up later in response to pre-set game stages.
Stage 7
So far, this Breakout style game has been a little bit dull to play. The whole idea of the game is to have a wall of bricks to smash through using the ball. Fortunately, this is just the moment to add the bricks to our version.
We are also going to explore JavaScript arrays a little plus a little maths.
We already know that drawing rectangular bricks is pretty straightforward but it is a good idea to collect some data on the bricks together into yet another JavaScript object. I called this one brickConstants as it contains values relating to all of the bricks rather than detail about a specific brick.
var brickConstants = {
    width: 0,
    height: 20,
    colCount: 14,
    rowCount: 8,
    border: "black",
    scores: [7,7,5,5,3,3,1,1],
    colours: ["red","red","orange","orange","green","green",
              "yellow","yellow"]
};
The width value in the new object starts at 0 (zero) as the width will be related to the playing area width and we can only check that when the canvas is sized. The colCount value is 14 because that is the “official” number of bricks in each row. There are 8 rows of bricks and they are coloured red in the top two rows and yellow in the bottom rows. The player’s score increases by 1 for each brick destroyed in the bottom two rows and a mighty 7 for bricks in the red row. The colours and score values are stored in eight element arrays. The scores array holds numbers and the colours array holds eight colour name strings.
We also need a list of the bricks that need drawing onto the canvas area. We can achieve that with an array holding a Boolean true or false value for each brick. They will all start set true which means a given brick should be drawn but individuals will be set to false as they are destroyed during the game action. The list is first created as an empty array so add the following to the JavaScript file.
var bricks = [];
Typing in a value for each of the bricks in that array would be tedious and error prone. The answer is to write a function that does that for us. We can call that function createBricks().
function creatBricks() {
    for(let i = 0; i < brickConstants.rowCount; i++){
        bricks.push([]);
        for(let j = 0; j < brickConstants.colCount; j++){
            bricks[i].push(true); // bricks start visible = true
        }
    }
}
Even though that function is pretty short it needs some explanation. As previously mentioned, all JavaScript variables are in reality objects. Sometimes we just think of them as numbers or strings but under the JavaScript hood they are all objects. An array is also an object. An array can contain a list of JavaScript objects and those objects could also be arrays.
The createBricks() function starts with a for loop that loops around eight times; from 0 to 7, once for each brick row. On each loop the array push() method is used to add a new empty array to the bricks array. The inner for loop adds 14 entries (remember brickConstants.colCount was set to a value of 14) to each of those new arrays with each entry set to a value of true. The value true is going to stand for visible or not yet broken out of the wall.
We have created what is effectively a two-dimensional array. The first dimension represents each row of bricks and the second each brick in a given row. The total number of elements is 8 multiplied by 14 which is 112.
We next need to add a line to the initialise() function to call this function. Place it before the line that calls the resizeCanvas() function. We will need the bricks to be in place before we draw the game layout for the first time.
creatBricks();
Then the resizeCanvas() function itself needs a line adding at the end, to set the brickConstants.width value to one fourteenth of the current width of the canvas element.
brickConstants.width = canvas.width / brickConstants.colCount;
With all that in place we now have enough information to draw our bricks - so let’s write a function to do just that.
function drawBricks() {
    for(let i = 0; i < brickConstants.rowCount; i++) {
        for(let j = 0; j < brickConstants.colCount; j++){
            if(bricks[i][j]){
                ctx.beginPath();
                ctx.rect(j * brickConstants.width,
                         i * brickConstants.height,
                         brickConstants.width, brickConstants.height);
                ctx.fillStyle = brickConstants.colours[i];
                ctx.strokeStyle = brickConstants.border;
                ctx.fill();
                ctx.stroke();
                ctx.closePath();
            }
        }
    }
}
First off, you can type the very long line of JavaScript code that starts “ctx.rect” in as a single line if you want. It is shown here as three physical lines so that it fits neatly on the page.
Now just what is the function doing? As you might expect there are two for loops with one nested inside the other. For each row of bricks, we are checking the 14 individual bricks in that row to see if it is visible. The check is “if(bricks[i][j])” and could have been written “if(bricks[i][j] === true)” and that would have had the same meaning. The check for true or false is implicit. If the brick is visible then it is drawn on the canvas although the position of the brick has to be calculated from the column (j) and the brick width together with the row (i) and the brick height.
We can now add a call to the drawBricks() function to the bottom of the redraw() function as shown.
function redraw() {
    ctx.clearRect(0, 0, canvas.width, canvas.height);
    if (game.playing){
        manageBall();
    }
    drawPaddle();
    drawBricks();
}
We next need some code to detect collisions between our ball and any one of the bricks. A collision should zap the brick and “bounce” the ball. Collision detection is a key game programming technique.
The original book version of this project used trigonometry to calculate the position of eight points around the perimeter of the ball to see if they were in “collision” with a brick. The utility function called findPointOnCircle() proved very useful in later projects in the book. The use (indeed utility) of that approach can be followed if you check back later on the original “Stage 7” of the book.
This version starts with a generic function that can detect a collision between any circle and any rectangle. Well – the rectangles have to be oriented with the coordinate system. If the rectangles are skewed then rather more code would be required.
Don’t type this first version into your JavaScript file as we are going to briefly look at how it works before implementing a faster version that is specific to our game.
function interCircRect(circ, rect){
    //finds closest point on rectangle border to circle and compares distance to circle radius
        let closestX = (circ.x < rect.x ? rect.x : (circ.x > rect.x + rect.width ? rect.x + rect.width : circ.x));
        let closestY = (circ.y < rect.y ? rect.y : (circ.y > rect.y + rect.height ? rect.y + rect.height : circ.y));
        let dx = closestX - circ.x;
        let dy = closestY - circ.y;
        return Math.sqrt(dx*dx + dy*dy) <= circ.radius;
}
Based upon the calculated nearest point on the rectangle an x offset and y offset can be used as the notional shorter sides of a right angled triangle. The third side (the distance) can be calculated using the Pythagorous theorem and that value compared to the ball radius.
As it happens, calculating a square root is a tad slow (if you have ever tried such calculations by hand you might agree). It is quicker to compare the sum of dx squared and dy squared with the circle radius squared. We though, can go another step as the ball radius is not going to change so we could store the radius squared in the ball object. This will be an advantage as we will be using the function a lot.
Based upon our intended optimisations we can add that value to the ball object.
var ball = {
    x: 0,
    y: 0,
    moveX: 3,
    moveY: -2,
    radius: 12,
    radSquare: 12 * 12
};
Then a version of the interCircRect() function that is specific to our game. This is the one to add to the main.js file.
function ballRectCollision(rect){
    let closestX = (ball.x < rect.x ? rect.x : (ball.x > rect.x + rect.width ? rect.x + rect.width : ball.x));
    let closestY = (ball.y < rect.y ? rect.y : (ball.y > rect.y + rect.height ? rect.y + rect.height : ball.y));
    let dx = closestX - ball.x;
    let dy = closestY - ball.y;
    return (dx**2 + dy**2) <= ball.radSquare;
}
The expression dx**2 squares the value (raises it by a power of 2). We could have written dx * dx though or used Math.pow(dx, 2).
Now a function to check for collisions between visible bricks and our ball. First though a little “helper” function that returns an object representing the rectangle of any given brick in the bricks[][] array.
function getBrickRect(i, j){
    return {x: j * brickConstants.width,
            y: i * brickConstants.height,
            width: brickConstants.width,
            height: brickConstants.height};
}
The syntax should be familiar as it is very similar to the named objects already in our code representing our ball or the paddle (indeed most like the paddle).
Now the collision detection being applied in a new function brickHits():
function brickHits(){
    // is the ball within a brick row?
    if((ball.y - ball.radius) > brickConstants.height * brickConstants.rowCount){
        return; // not in area of wall
    }
    for(let i = brickConstants.rowCount - 1; i >= 0; i--){
        //for each row of bricks in reverse
        for (let j = 0; j < brickConstants.colCount; j++){
            //check each brick in row
            if(bricks[i][j]){
                // if the brick is still visible
                let rect = getBrickRect(i,j);
                if(ballRectCollision(rect)){
                    bricks[i][j] = false;
                    game.score += brickConstants.scores[i];
                    score.textContent = "Score: " + game.score;
                    ball.moveY = Math.abs(ball.moveY); // at least for now
                }
            }
        }
    }
}
The loop setting the row (variable i) counts backwards from 7 to 0 so the most likely rows for a “hit” are checked first.
If a collision is detected then the bricks array value is set to false (so it will not be redrawn), the score incremented by the appropriate value and the ball set running back down the game area as it has “bounced” off the brick.
We need to add a call to brickHits() to the manageBall() function.
function manageBall(){
    drawBall();
    brickHits();
    hasBallHitWall();
    hasBallHitTop();
    hasBallHitPaddle();
    if (ballHasHitBottom()){
        ballLost();
        return;
    }
    ball.x += ball.moveX;
    ball.y += ball.moveY;
 }
It was at this stage that I thought it might be a good idea to use a press on the keyboard space bar to release a new ball during a game and just use the enter key to start a new game. This idea required a change to the keyPressed() function to use keyCode 32 (space) where we had previously used keyCode 13 (enter) and to add some new JavaScript to respond to the enter key. You can tell I was making this code up as I went along but that is how all programs are written. Start with something simple that works and then add new features on a growing path towards completion.
Now comes one of those inevitable stages when writing a program where you realise that an important function should be re-organised. Sometimes that means changing the way it works and at other times it might mean moving some of the code out to another function that can be called when it is needed. The underlying principle here is that you want your code to be easy to read and to change in the future.
The current version of keyPressed() tests for three different key presses and now we want to add another one. Also, the current way it works is to use three if statements that all check the same value. It is clearly time to change to a “select” statement in a somewhat simplified keyPressed() function that also includes some “space bar” action.
function keyPressed(event){
    switch(event.keyCode){
        case 13: // return key
            if(game.playing === false && game.lives === 0){
                startTheGame();
            }
            break;
        case 32: // Space Bar
            if(!game.playing){ // if game.playing === false
                mess.style.display = "none";
                placeBall();
                game.playing = true;
            }
            break;
        case 37: // Left arrow
            if(paddle.moveBy === 0) {
                paddle.moveBy = -paddle.moveX;
            }
            break;
        case 39: // right arrow
            if(paddle.moveBy === 0){
                paddle.moveBy = paddle.moveX;
            }
            break;
    }
}
That revised function calls some other new functions that we need to add.
function startTheGame() {
    game.lives = 3;
    game.score = 0;
    score.textContent = "Score: 0";
    resetWall();
    mess.textContent = "Press Space Bar to start";
}
That new function calls:
function resetWall() {
    for(let i = 0; i < 8; i++){
        for(let j = 0; j < brickConstants.colCount; j++){
            bricks[i][j] = true; // all bricks set visible
        }
    }
}
The HTML file needs a change to the game start message in lblMessage
<div id="dvMessage">
     <label id = "lblMessage">Press Space Bar to start</label>
</div>
The ballLost() function also needs a change to the messages.
function ballLost(){
    game.playing = false;
    game.lives--;
    if(game.lives > 0){
        mess.textContent = "Press Space Bar for next ball";
    } else {
        mess.textContent = "Game Over - Press Return for new game";
        if(game.score > game.highScore){
            game.highScore = game.score;
            hScore.textContent = "High Score: " +
                                 game.highScore;
        }
    }
    mess.style.display = "block";
}
We are now much closer to a playable game. Give it a whirl. You might well notice some issues that need to be addressed but you can bounce the ball against the wall and collect points when you hit the bricks. The bounce is not entirely realistic when the ball hits brick or paddle corners but we can fix that.
The next steps are all about improving the game play experience. We need to add a dash of challenge to make the game more engaging. The “official” Breakout game rules include ball speed changes at set intervals, a reduction in the paddle size at a specific stage plus we also need a way to win this game. The original game presented two complete walls to break through before the game ended on a maximum score of 896.
Stage 8
We can start with a visual change by introducing another pair of HTML elements where we can draw the unused game balls. Change the content of the dvGameBar div to include the new dvBalls div and the enclosed canvas element.
<div id="dvGameBar">
    <div id="dvBalls">
        <canvas id="cvBalls"></canvas>
    </div>
    <div id="dvMessage">
        <label id = "lblMessage">Press Space Bar to start</label>
    </div>
   <div id="dvScore">
       <label id = "lblScore">Score: 0</label>
   </div>
   <div id="dvHighScore">
        <label id="lblHighScore">High Score: 0</label>
    </div>
</div>
The main.css file needs to provide some support for these new elements and the dvMessage div needs to make some space.
#dvMessage {
    float: left;
    width: auto;
    margin-left: 150px;
}
#dvBalls {
    float: left;
    width: auto;
    margin-left: 40px;
}
Then add something for the new canvas element.
#cvBalls {
    margin-top: 1px;
    background: #cccccc;
}
We will need two new JavaScript variables to link to the new canvas element.
var waiting = document.getElementById("cvBalls");
var waitingCtx = waiting.getContext("2d");
We also need a variable that allows us to update the game timer. So also add:
var tmr;
The game object should be expanded as follows:
var game = {
    lives: 3,
    playing: false,
    score: 0,
    highScore: 0,
    speed: 10,
    acceleration: 0,
    maxScore: 448, // cleared a full set of blocks
    testing: false,
    hits: 0,
    paddleReduction: 20,
    round: 1,
    started: false
};
The game object now has a value representing the score that ends a round, another value to track which round we are in and a member called testing. The purpose of that value is to allow us to cheat during testing to ensure that we can get to the latter stages of the game to check on what happens there. The “started” Boolean has been added because we (well me) have rather hijacked the “playing” value to indicate that a ball is in play. There are some others additions which we will look at as the relevant code comes up.
The paddle object needs another member – reduced.
var paddle = {
    x: 0,
    y: 0,
    height: 10,
    width: 70,
    reduced: false,
    moveX: 3,
    moveBy: 0
};
There are a lot of code changes in this final version to create the complete game. It is often true that the closer you get to the end of a program designed to interact with users (games are an obvious example) the more code tweaks and additions you find yourself writing. You have more or less solved the technical challenges but now you need to polish things.
Start with a new function to enhance the user interface drawWaitingBalls().
function drawWaitingBalls(howMany){
    waitingCtx.clearRect(0, 0, waiting.width, waiting.height);
    for(let b = 0; b < howMany; b++){
        waitingCtx.beginPath();
        waitingCtx.arc(b * ball.radius * 3 + ball.radius,
                    waiting.height / 2, ball.radius, 0, Math.PI*2);
        waitingCtx.fillStyle = "blue";
        waitingCtx.fill();
        waitingCtx.closePath();
    }
}
That function draws the number of balls waiting to be played in a row onto the new canvas object.
The number of waiting balls changes when a new ball starts into the game. So we should add to the placeBall() function to update the display using the new drawWaitingBalls() function. While we are adding to that function we could also introduce some variety to the ball launch point and angle. Step one in enhancing the game play.
function placeBall(){
    ball.x = Math.floor(Math.random() * (canvas.width - ball.radius * 2)) + ball.radius;
    ball.moveX = Math.abs(ball.moveX);
    if(ball.x > canvas.width / 2){
        ball.moveX = -ball.moveX;
    }
    //ball.x = canvas.width / 4;
    ball.y = canvas.height - (ball.radius + paddle.height);
    ball.moveY = -(Math.abs(ball.moveY));
    drawWaitingBalls(game.lives -1);
}
Math.random()
The Math.random() function returns a pseudo-random real number in the range zero to one. The range includes zero but not one.
A pseudo random number is one derived from a mathematical formula which should produce a good even distribution of values across the range.
However, these numbers are not truly random and should not be used for cryptographic purposes. However they are great when all we want to do is set the ball start position so that it is not always the same.
If we wanted a random number between two values we could write a function like:
    function getRandom(min, max) {
        Math.random() * (max - min) + min;
    }
If we wanted a random integer between two values we could tweak that to:
    function getRandomInteger(min, max) {
        min = Math.ceil(min);
        max = Math.floor(max);
        return Math.floor(Math.random() * (max - min)) + min;
    }
The initialise() function also needs a little more code to size the “waiting” canvas and to draw the initial 3 waiting balls. We also set the new tmr variable and the timer to the initial game speed.
function initialise(){
    window.addEventListener("resize", resizeCanvas);
    window.addEventListener("mousemove", mouseHasMoved);
    window.addEventListener("keydown", keyPressed);
    window.addEventListener("keyup", keyReleased);
    paddle.x = (window.innerWidth - paddle.width) / 2;
    creatBricks();
    resizeCanvas();
    waiting.height = bar.clientHeight - 2;
    waiting.width = ball.radius * 9;
    drawWaitingBalls(game.lives);
    tmr = setInterval(redraw, game.speed);
}
The game restart function also needs an extra line to draw the waiting balls and to set the new game.started value. We also re-set some other game values. Take note of the second line that sets three values to zero all in one line.
function startTheGame() {
    game.lives = 3;
    game.score = game.hits = game.acceleration = 0;
    game.round = 1;
    score.textContent = "Score: 0";
    resetWall();
    drawWaitingBalls(game.lives);
    mess.textContent = "Press Space Bar to start";
    game.started = true;
}
If you run some tests of the new code you might notice that you can keep on launching new balls with the space bar after all of the “lives” have been lost. We should fix that in keyPressed() and make provision for a cheat mode to help with testing the full game. There are multiple changes here so please check each line.
function keyPressed(event){
    switch(event.keyCode){
        case 13: // return key
            if(game.started === false && game.lives === 0){
                startTheGame();
            }
            break;
        case 32: // Space Bar
            if(!game.playing){ // if game.playing === false
                mess.style.display = "none";
                game.playing = true;
            }
            if (game.lives > 0){
                placeBall();
            }
            break;
        case 37: // Left arrow
            if(paddle.moveBy === 0) {
                paddle.moveBy = -paddle.moveX;
            }
            break;
        case 39: // right arrow
            if(paddle.moveBy === 0){
                paddle.moveBy = paddle.moveX;
            }
            break;
        case 84: // letter t
            game.testing = !game.testing; // toggle the testing boolean
            break;
    }
}
You might wonder why this test is just for a “t” key and not something more complex like a <ctrl><t> or <alt><t> combination. The reason is that a great number of such key combinations have already been “bagged” by the browsers. The most common keyboard shortcuts (as these combinations are known) appear at the back of this book among the appendices.
Also the game.started value needs setting in ballLost().
function ballLost(){
    game.lives--;
    game.playing = false;
    if(game.lives > 0){
        mess.textContent = "Press Space Bar for next ball";
    } else {
        mess.textContent = "Game Over - Press Return for new game";
        if(game.score > game.highScore){
            game.highScore = game.score;
            hScore.textContent = "High Score: " +
                                 game.highScore;
        }
        game.started = false;
    }
    mess.style.display = "block";
}
We need to make provision for a player to get past the first round of this game.
function roundTwo(){
    mess.textContent = "Round 2 - press Space Bar to restart ball";
    mess.style.display = "block";
    drawWaitingBalls(game.lives);
    resetWall();
}
Plus a function to change the speed of the game during play – we can work out when and by how much later.
function changeSpeed() {
    clearInterval(tmr);
    tmr = setInterval(redraw, game.speed - game.acceleration);
}
That last one uses the value held in the variable tmr to stop the current timer before another one is started. If you don’t stop the first then both will run together and both will fire the redraw function which would be visually interesting but unhelpful.
The brickHits() function needs some additions to count the hits, trigger some game accelerations (or a paddle size reduction) – plus add some interest to the ball bounce.
All the code additions follow the existing line that updated the displayed game score.
function brickHits(){
    if((ball.y - ball.radius) > brickConstants.height * brickConstants.rowCount){
        return; // not in area of wall
    }
    for(let i = brickConstants.rowCount - 1; i >= 0; i--){
        //for each row of bricks in reverse
        for (let j = 0; j < brickConstants.colCount; j++){
            //check each brick in row
            if(bricks[i][j]){
                // if the brick is still visible
                let rect = getBrickRect(i,j);
                if(ballRectCollision(rect)){
                    bricks[i][j] = false;
                    game.score += brickConstants.scores[i];
                    score.textContent = "Score: " + game.score;
                    game.hits++;
                    setGameDifficulty(i);
                    if(rect.x + rect.width < ball.x && ball.moveX < 0){
                        ball.moveX = -ball.moveX;
                    } else {
                        if(rect.x > ball.x && ball.moveX > 0){
                            ball.moveX = -ball.moveX;
                        }
                    }
                    if (rect.y > ball.y){
                        ball.moveY = -Math.abs(ball.moveY);
                    } else {
                        ball.moveY = Math.abs(ball.moveY);
                    }
                }
            }
        }
    }
    checkScore();
}
If you add an empty setGameDifficulty() function and an empty checkScore() (we will return to them shortly) you can run a test and admire the improved ball bounces from the wall bricks.
function setGameDifficulty(row) {
}
function checkScore(){
}
The ball now bounces in the X direction when the ball is to the left or right of a brick. Plus provision is made for a vertical bounce off a brick that is below the ball – it happens sometimes.
You may remember that the ball and paddle collision detection was a little simplistic. If we use the same rectangle collision detection that we are using for the bricks we can improve bounce performance there as well. Fortunately, the paddle object contains all of the necessary members to make it a valid rectangle for this purpose. We can rewrite the contents of the hasBallHitPaddle() function as follows:
function hasBallHitPaddle(){
    if(ballRectCollision(paddle)){
        ball.moveY = -Math.abs(ball.moveY);
        //now allow for a offset hit
        if(ball.x < paddle.x){
            ball.moveX = -Math.abs(ball.moveX);
        } else {
            if (ball.x > paddle.x + paddle.width){
                ball.moveX = Math.abs(ball.moveX);
            }
        }
    }
}
Testing all of that code can be a bit of a fiddle but it is quickly obvious that the ballRectCollision() function works just fine for the paddle. On the subject of testing, this is probably a good moment to implement the cheat mode in hasBallHitBottom(). You are probably going to need this for further testing. Just hit the “t” key to turn it on and the same key again to turn it off.
function ballHasHitBottom(){
    // testing support
    if((ball.y + ball.moveY + ball.radius) >= canvas.height){
        if (game.testing){
            ball.moveY = -ball.moveY;
            return false;
        }
        return true;
    }
    return false;
    //return (ball.y + ball.moveY + ball.radius) >= canvas.height;
}
Now the new functions, starting with the last which is checkScore(). Take a look at the second case statement in that function. It is not using a fixed value but an expression. This is allowed in JavaScript.
function checkScore(){
    switch(game.score){
        case game.maxScore:
            if(game.round === 1){
                game.round++;
                game.playing = false;
                roundTwo();
            }
            break;
        case game.maxScore * 2:
            game.playing = false;
            game.lives = 0;
            mess.textContent = "Winner with maximum score! Return to restart.";
            mess.style.display = "block";
            game.started = false;
            break;
    }
}
With that in place, it is time to run an extensive test. Start the game, set cheat mode on and then let the game run until the first wall has been completely demolished. Then relaunch the ball for round 2. Finally, let it run again and check that the game can be completed.
Now to make things a little more difficult for the player.
The function setGameDifficulty() is intended to speed up the ball at set intervals and to reduce the paddle width when the player first breaks into the last row of bricks.
Take care with the brackets for the second if statement.
function setGameDifficulty(row) {
        let accelerate = false;
        if(game.hits === 4 || game.hits === 12){
            accelerate = true;
        }
        if((row === 1 && game.acceleration < 4) ||
           (row === 3 && game.acceleration < 3)){
            accelerate = true;
        }
        if(row === 0 && paddle.reduced === false){
            paddle.width -= game.paddleReduction;
            paddle.reduced = true;
        }
        if(accelerate) {
            game.acceleration++;
            changeSpeed();
        }
}
Time to run another test. You will probably notice that when the game is lost (or completed) that the ball speed and paddle width have not been reset. So we can attend to that now.
We can apply the reset in the startTheGame() function.
function startTheGame() {
    game.lives = 3;
    game.score = game.hits = game.acceleration = 0;
    game.round = 1;
    if(paddle.reduced){
        paddle.reduced = false;
        paddle.width += game.paddleReduction;
    }
    game.acceleration = 0;
    changeSpeed();
    score.textContent = "Score: 0";
    resetWall();
    drawWaitingBalls(game.lives);
    mess.textContent = "Press Space Bar to start";
    game.started = true;
}
Then, inevitably, run another round of tests.

Review
There is a lot you can tweak in this game to make it your own. First there is the ball size and speed, then there is the paddle size. It may not be obvious, until you try some changes, that the browser window size and shape also influences the game experience.
As this was the first program in this book you may have run into difficulties and found it difficult to locate your code errors. The next chapter might feel a bit late but this is a good moment to try out some debugging techniques on a reasonably sized code base.
In any case, we have written and tested a lot of JavaScript code. We have also written and tuned a playable vintage arcade style game. This has involved the simulation of motion by repeatedly drawing on a canvas HTML element. We have incorporated user input from a keyboard and mouse and we have added game elements to keep score and provide player feedback. Not a bad start and you can be sure that we will be using almost everything you have learned in this chapter as we proceed.
Just to show that there is lots of life left in this game format take a look at this version.
The next game, of course, is almost completely different.
Code downloads for this chapter are available here.